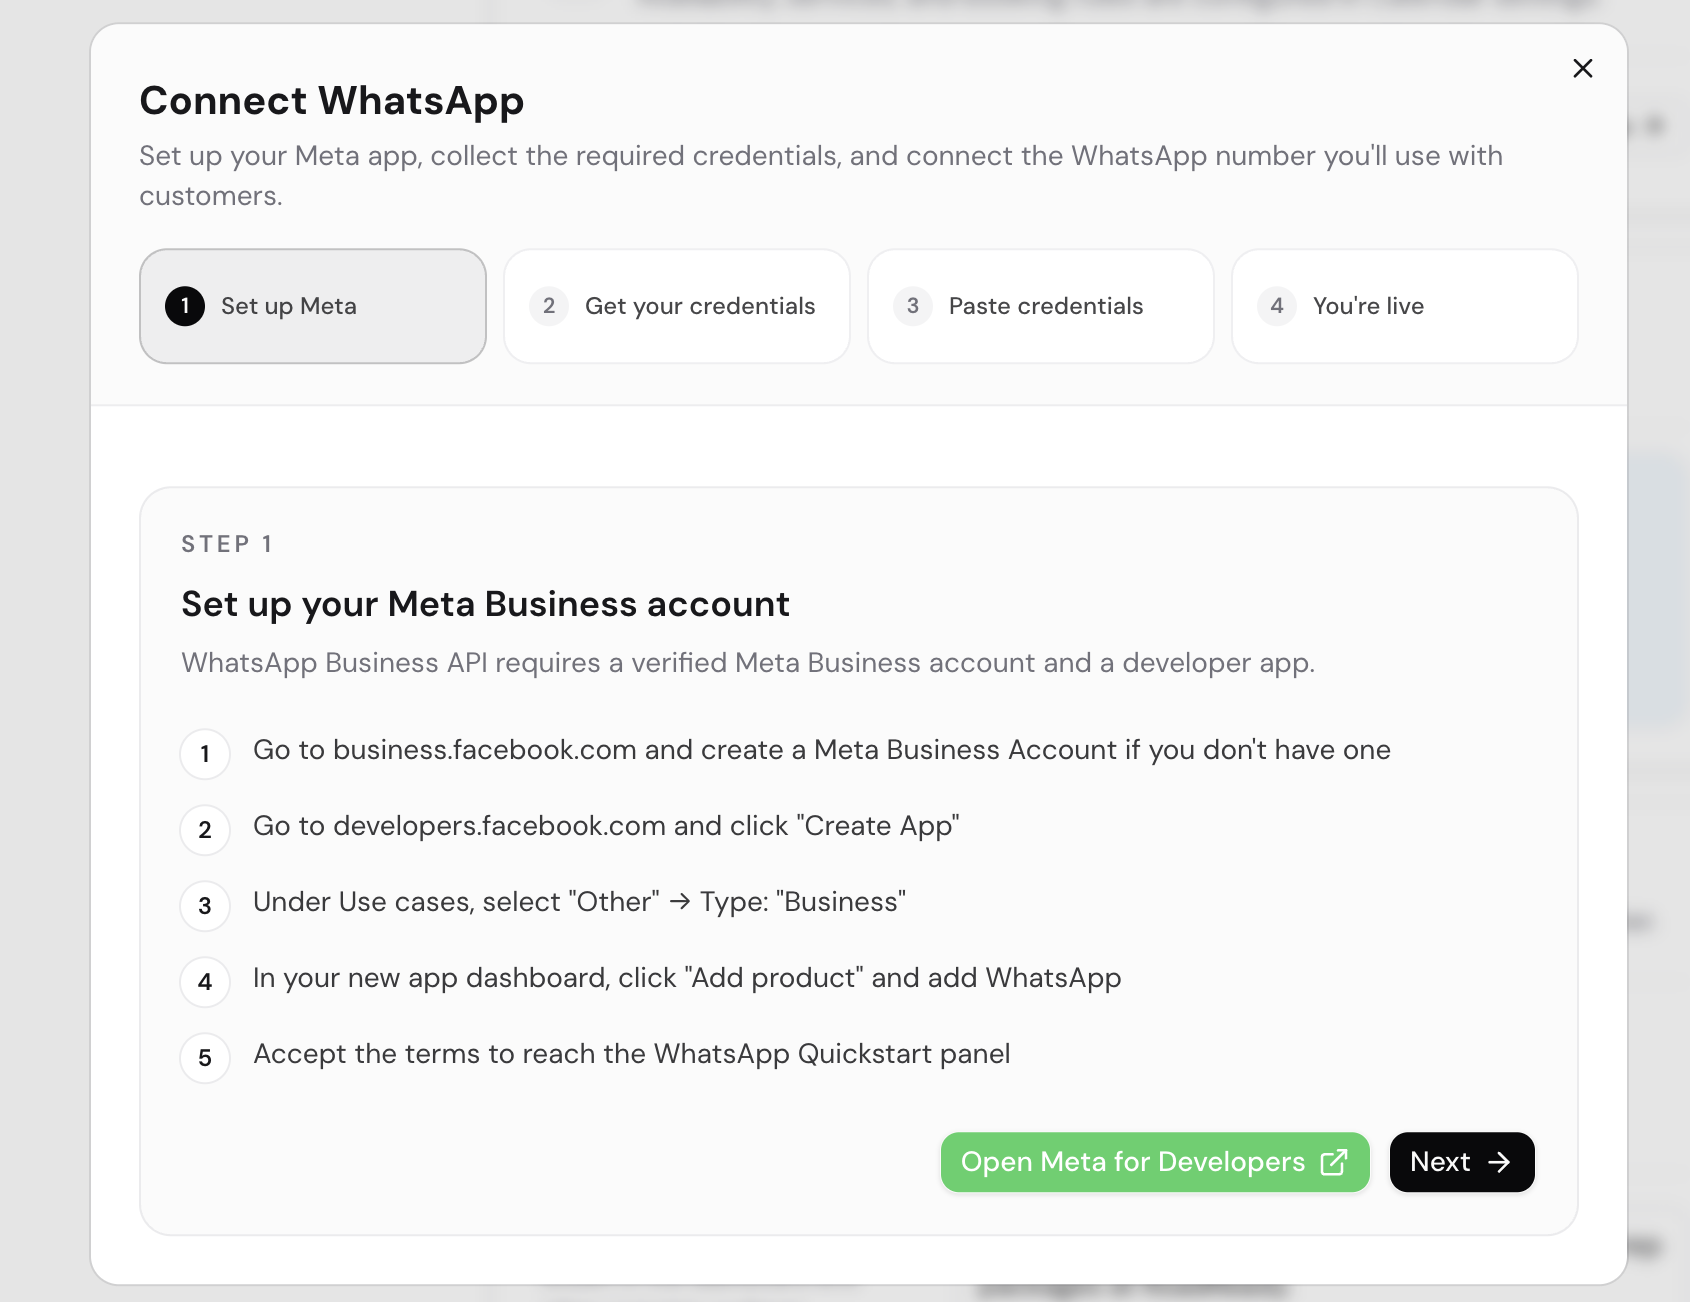
Connect WhatsApp
Set up a Meta developer app, gather three credentials from the API Setup panel, and connect your WhatsApp Business number from bot settings.
Use this guide when the flow is ready and you want to connect the WhatsApp number customers should message. Budget around 20–30 minutes for the Meta side.
What you need before starting
WhatsApp Business runs on Meta's Cloud API. Before opening the connection dialog in Meerlume, three things must be in place on the Meta side.
- Meta Business Account — create one at
business.facebook.comif you do not have one. It must be linked to a Facebook Page. - A phone number not registered on WhatsApp — the number cannot be active on any WhatsApp account, personal or Business App. If it is, you must delete the WhatsApp account from that device first (WhatsApp Settings → Account → Delete account) before proceeding.
- Business verification (recommended) — unverified accounts are limited to messaging only 5 manually pre-approved contacts. Verification unlocks production access and typically takes 2–10 business days.
Create a Meta developer app
Open Meta for Developers
Go to developers.facebook.com, log in with your Meta account, and click My Apps → Create App.
Choose the WhatsApp use case
When prompted for a use case, select "Connect with customers through WhatsApp". Meta automatically provisions a test WhatsApp Business Account (WABA) and a test phone number under your app.
Link your Meta Business Account
On the next screen, select the Business Account you created. If your business is not yet verified you can still continue — you will be limited to the test number and 5 contacts until verification completes.
Open the API Setup panel
Inside your new app, navigate to Products → WhatsApp → API Setup. This panel shows your Phone Number ID, WABA ID, and a temporary access token — the three credentials Meerlume needs.
Collect your credentials
All three credentials are visible in the API Setup panel of your Meta developer app.
- Phone Number ID — shown in the "From" section of the API Setup panel. Use the test number's ID while testing; switch to your real number's ID once you add it.
- WABA ID — displayed just above the access token in the same panel. It identifies your WhatsApp Business Account.
- Access Token — the panel shows a temporary token that resets each session. For production, create a permanent System User token instead (see the tip below).
Use a permanent token for production
Temporary tokens expire and will silently break the connection. To create a permanent one: go to Meta Business Settings → Users → System Users, create a System User with admin access to your WABA, then generate a token with Never expiry and the whatsapp_business_messaging and whatsapp_business_management permissions selected.
Add your real business phone number
The test number Meta provides can only reach 5 pre-approved contacts. To message real customers you must register your own number.
Open Phone Numbers
In your app, go to Products → WhatsApp → Phone Numbers and click Add Phone Number.
Enter your business display name and category
This is what customers will see in their WhatsApp chat. The name should match your registered business name — Meta may review it for policy compliance.
Enter the number and verify
Type the number and request a verification code via SMS or voice call. Meta sends the code directly to that number, so you must have access to receive it.
Copy the new Phone Number ID
After verification the number appears in the Phone Numbers list. Use its Phone Number ID (not the test number's ID) when connecting in Meerlume.
The number must not be active on WhatsApp
If the number is registered on a personal or WhatsApp Business App account, registration will fail. Remove it from WhatsApp first: open the app on the device, go to Settings → Account → Delete account, then return to Meta and proceed.
After the channel is connected
Once connected, WhatsApp becomes one of the live channels shown for the bot. Publish the latest draft before traffic starts if you still have unpublished flow changes.
Deploy order
A good sequence is: finish the draft, preview it, publish it, then connect or verify the live channel.
Related guides
Continue with the next part of the setup once this step is stable.
Preview drafts and publish
Test the conversation before it goes live, understand the draft/live split, and publish only when the workflow is ready.

Connect Telegram
Create a bot with BotFather, paste the token in settings, and use the generated share link once the bot is live.
Triage submissions in the inbox
Read what customers sent, change status, reply or take over the chat, approve or reschedule bookings, and archive — keep follow-up moving without getting buried.